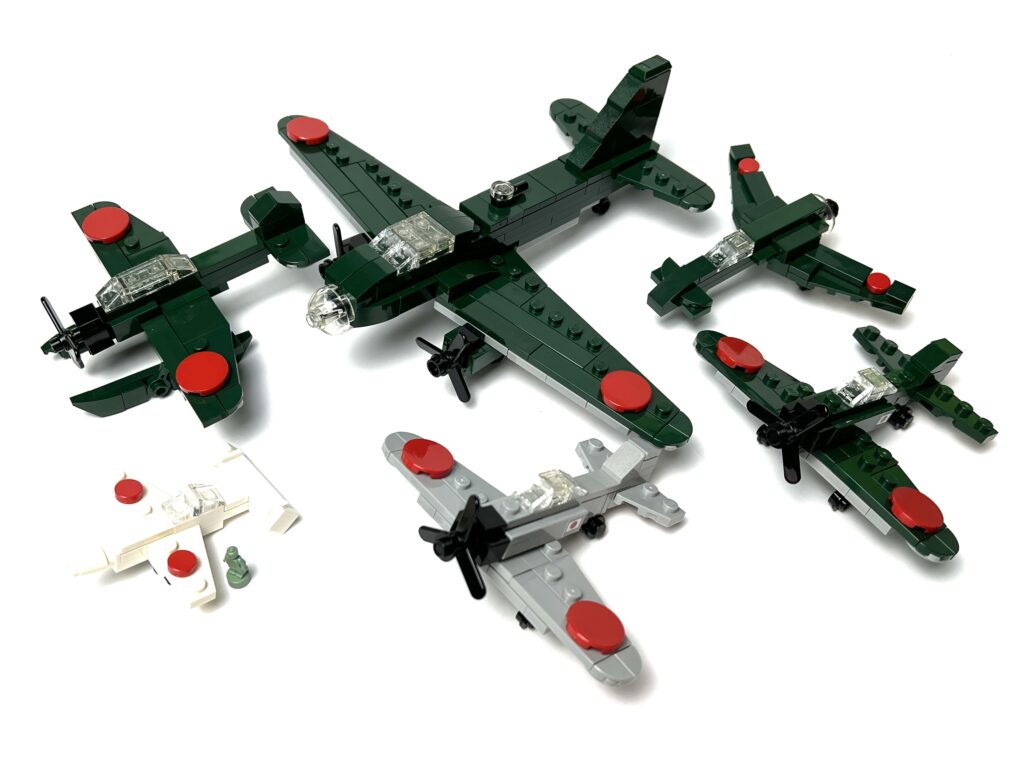
Japan’s aviation industry in WWII produced some of the most iconic aircraft of the Pacific War. From the nimble Zero to experimental jet-age designs, these machines defined both Japan’s early dominance and desperate late-war innovation.
Mitsubishi A6M Zero – The Legend of the Pacific
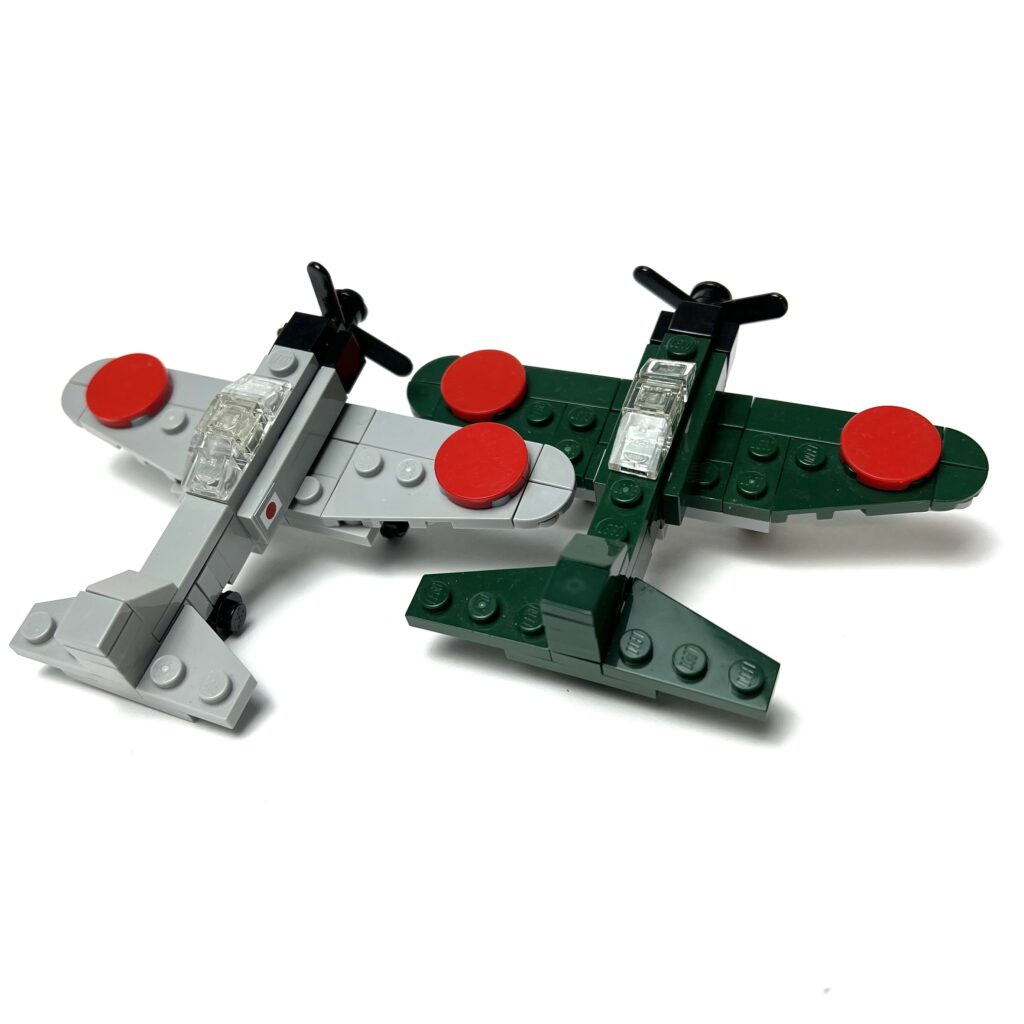
The A6M Zero was Japan’s most famous fighter. Highly maneuverable, long-ranged, and deadly in the early years of the war, it dominated Allied skies. However, its light armor and lack of self-sealing fuel tanks made it vulnerable once newer Allied fighters appeared.
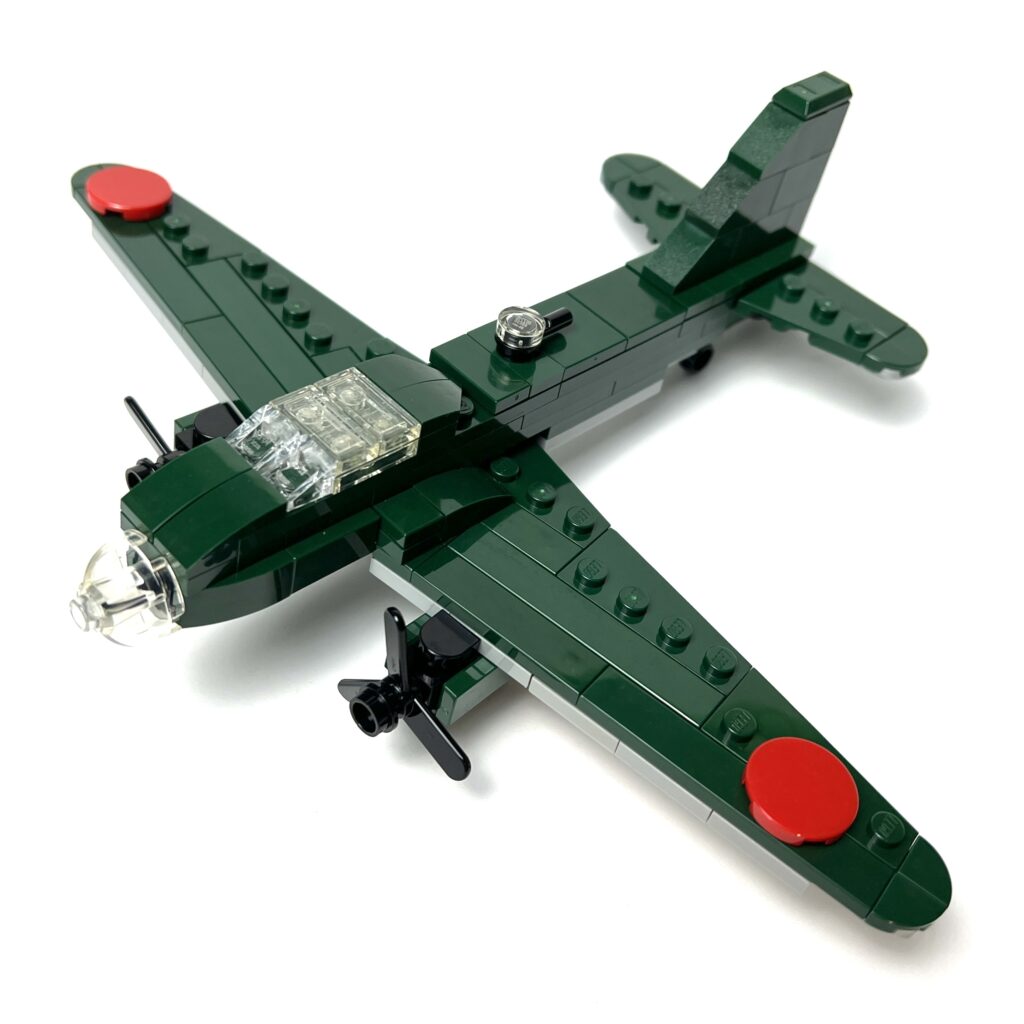
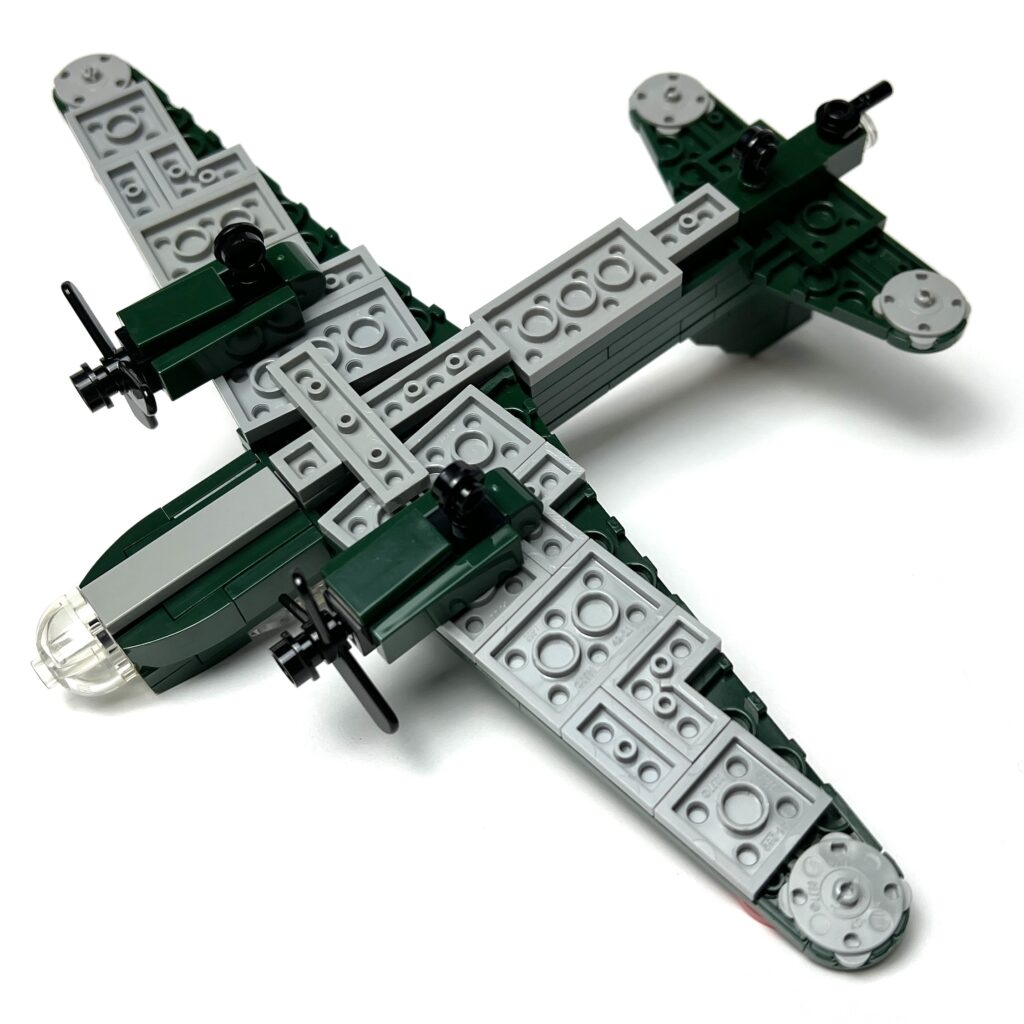
Mitsubishi G4M “Betty” – The Long-Legged Bomber
Nicknamed the “Betty” by the Allies, the G4M was Japan’s main twin-engine bomber. It had impressive range, enabling long missions across the Pacific, but like the Zero, it lacked armor and was highly flammable. Despite this, it carried out famous missions, including the attack that killed Admiral Yamamoto in 1943.
This big model uses some brick bending to get the wings to align in the right way, striving for accuracy. It’s easier to do when the model is bigger.
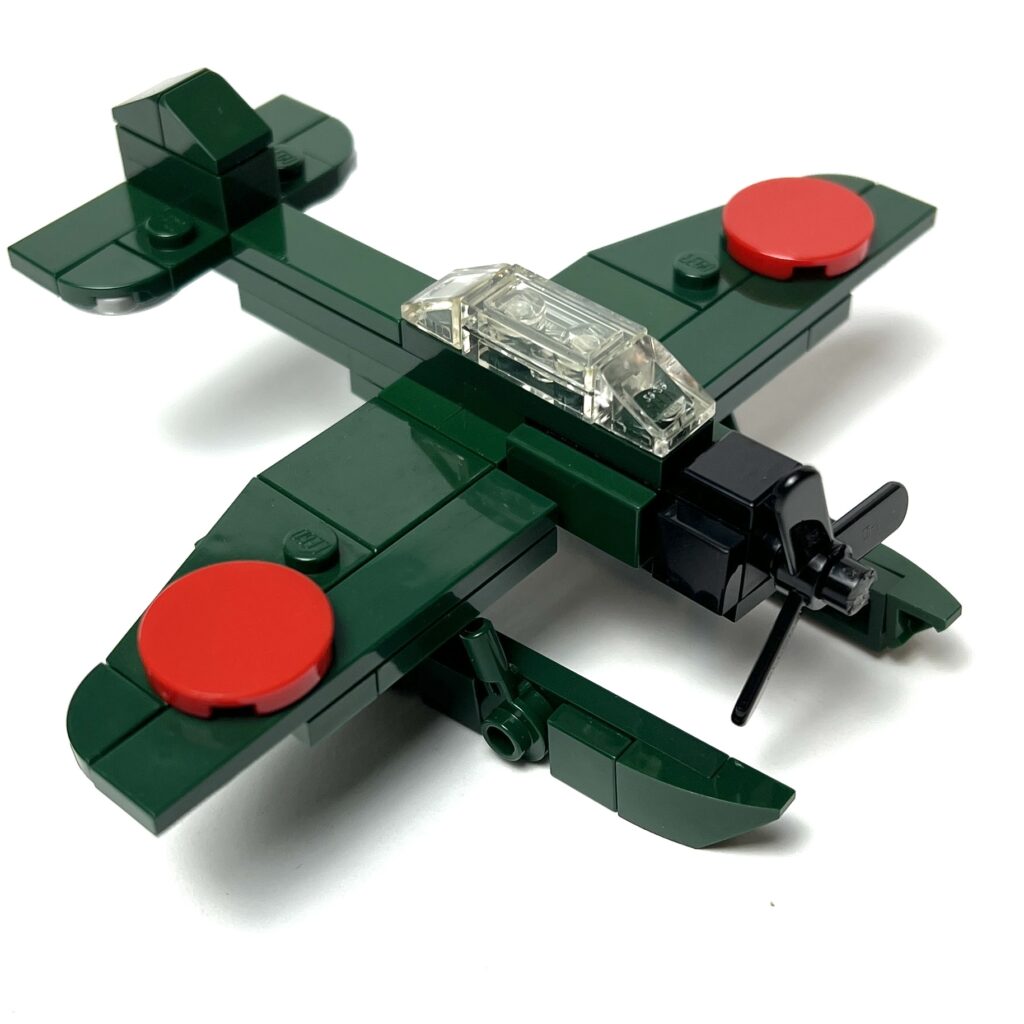
Aichi E13A “Jake” – The Recon Workhorse
The E13A was a floatplane used extensively for reconnaissance, maritime patrol, and even bombing missions. Launched from cruisers and battleships, it served as the “eyes of the fleet” throughout the Pacific. Versatile and reliable, it was one of Japan’s most numerous seaplanes.
Kyushu J7W Shinden – The Forward-Thinking Interceptor
The J7W Shinden was a radical late-war prototype interceptor, designed with a canard layout and a rear-mounted engine. It was built to intercept B-29 bombers with heavy 30mm cannons. Only a handful were built before the war ended, but its futuristic design showed how far Japan was willing to push innovation.
I decided to build this one because I saw it in the movie Godzilla Minus One.
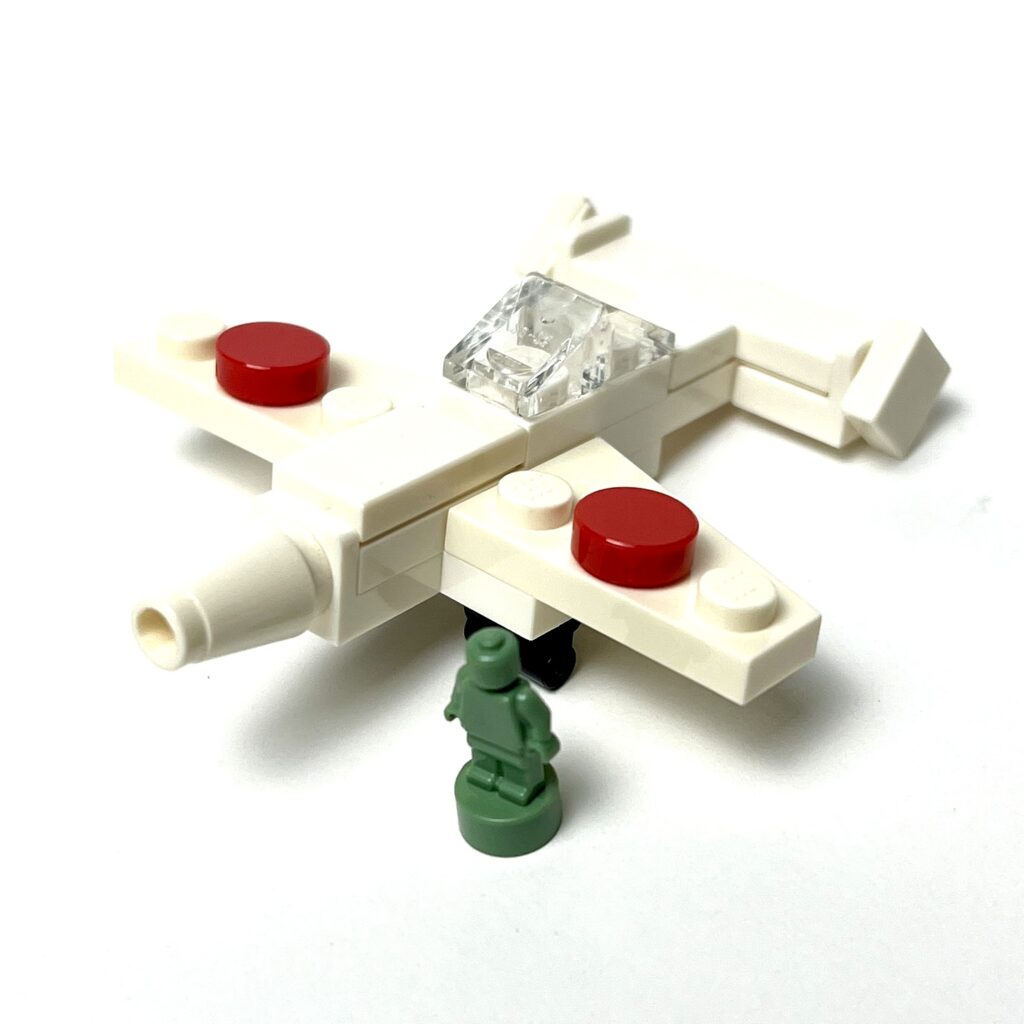
Yokosuka MXY-7 Ohka – The “Cherry Blossom” Rocket Plane
One of the most infamous late-war creations, the Ohka was a single manned rocket-propelled Kamikaze aircraft. Carried under a bomber until close to its target, it would then detach and dive at ships at tremendous speeds. While devastating if it struck, its short range made it vulnerable to interception. The Ohka symbolized Japan’s increasingly desperate tactics as the war drew to a close.
Looking back to iconic World War II armor, the German Panzers and Soviet T-34s often come to mind first. But the British Army brought its own steel guns to the battlefield, combining ingenuity with resilience. I’ve recreated some of these legendary vehicles in LEGO, and you can check out the builds, photos, and tutorials below.
Cromwell Tank
Fast, reliable, and one of the most successful British tanks of the war, the Cromwell could keep pace with Allied advances after D-Day. Its speed made it perfect for reconnaissance and flanking maneuvers, while its 75mm gun was a solid upgrade from earlier British armor. My LEGO version captures its low profile and sleek design.
Matilda II
Nicknamed the “Queen of the Desert,” the Matilda II was heavily armored and played a crucial role in the North African Campaign. While it was slow, its thick armor could withstand most early German anti-tank weapons, making it a formidable presence on the battlefield. Building this in LEGO meant emphasizing its bulky body and heavy track design. I like the use of the lightsaber hilt at the back to represent oil drums.
Sherman Firefly
M4 Sherman vs Firefly
Perhaps the most famous British modification of an American tank, the Sherman Firefly packed a powerful 17-pounder gun capable of taking out even the dreaded Tiger I. Crews had to be clever about disguising it so the long barrel didn’t make it a target, but when it opened fire, it was a game-changer. My LEGO build highlights that distinctive gun barrel — the Firefly’s defining feature, with the use of 1×4 bar with a techic pin.
Universal (Bren) Carrier
Small but incredibly useful, the Universal Carrier — often called the Bren Carrier — was one of the most produced armored vehicles of WWII. It wasn’t just for combat; it carried troops, supplies, and even towed small guns. Its versatility made it a backbone of British mechanized infantry support. Below you can see how it attaches together, only possible because of the middle stud under the 1×2 plate.
Churchill Tank
The Churchill was one of Britain’s heaviest and most versatile tanks. With thick armor and multiple variants, it could serve as a traditional tank, an engineering vehicle, or even carry flamethrowers. While not the fastest, its ability to cross difficult terrain made it a valuable workhorse in many campaigns. My LEGO model focuses on its distinctive long chassis with rounded edges.
Sexton Self-Propelled Gun
Built on the Canadian Ram tank chassis, the Sexton gave British and Commonwealth forces much-needed mobile artillery support. Armed with the reliable 25-pounder gun, it could keep pace with advancing troops and deliver powerful indirect fire. Unlike towed artillery, the Sexton could relocate quickly — making it invaluable in fast-moving operations. My LEGO build highlights the open-top fighting compartment and gun layout using bars, clips and 1×1 tiles with perhaps an illegal technique lol.
Bedford Truck
The unsung hero of the British war effort, the Bedford truck was the backbone of logistics. Whether hauling supplies, towing artillery, or transporting troops, these trucks kept the army moving. Without vehicles like the Bedford, the tanks and artillery would never have reached the front lines. My LEGO version captures its boxy cab and sturdy flatbed design, a nod to its role as the lifeline of the army.
These vehicles show the evolution of British design during the war: from the heavily armored Matilda II, to the versatile Churchill, the fast Cromwell, the deadly Firefly, and the hard-hitting Sexton. And of course, the humble Bren Carrier kept everything moving. Each one played its part in shaping the Allied victory.
When we think of the Eastern Front, we imagine endless fields of mud, snow, and steel clashing in some of the fiercest battles of World War II.
The Soviet Union, pushed to the brink in 1941, fought back with determination and a lineup of armored vehicles that held their own against the Germans. From nimble armored cars to monstrous heavy tanks, these machines turned the tide of war.
And now, you can see them recreated in LEGO form, brick by brick along with tutorials guiding you how to build your own.
BA-6 Armored Car
The BA-6 was a wheeled armored car used by the Soviets in the early years of WWII. Armed with a 45mm gun, it was mobile but lightly armored, often vulnerable against German panzers. Despite its weaknesses, it gave Soviet forces an edge in mobility during the first desperate stages of the war.
SU-76 Self-Propelled Gun
The SU-76 was the Soviet Union’s second-most produced armored vehicle after the T-34. Light, simple, and versatile, it supported infantry with both direct fire and artillery roles. It may not have been glamorous, but it was reliable and effective — a true workhorse.
SU-85 Tank Destroyer
The SU-85 was a Soviet self-propelled gun developed in 1943 to counter the appearance of heavy German tanks like the Tiger and Panther. Built on the reliable T-34 chassis, it carried an 85mm gun capable of piercing their thick armor at long range. Unlike a tank, it had no turret, but its low silhouette and powerful weapon made it a deadly ambusher on the battlefield. Below is the tutorial for the trio:
T-34 Medium Tank
The T-34 was the backbone of the Red Army and one of the most influential tanks of the entire war. With sloped armor, a powerful gun, and reliability in harsh conditions, it was a nightmare for German forces. The T-34 could be mass-produced, and sheer numbers, combined with effectiveness, helped shift the balance.
KV-2 Heavy Tank
Few tanks are as intimidating as the KV-2. With its towering turret housing a massive 152mm howitzer, the KV-2 was designed to smash bunkers and fortifications. It was slow and unwieldy, but when it showed up on the battlefield, German soldiers quickly learned to fear its sheer firepower.
IS-2 Heavy Tank
The IS-2 was a late-war Soviet beast, created to take on the German Tigers and Panthers. Armed with a powerful 122mm gun, it could destroy even the heaviest German tanks. With thick armor and brutal firepower, it became the pride of the Red Army as they advanced toward Berlin.
ISU-152 “Beast Killer”
The ISU-152 earned its terrifying nickname because of its ability to destroy the heaviest German tanks, including Tigers and Panthers. Armed with a massive 152mm gun, it doubled as both a tank destroyer and assault gun. Slow but devastating, it was a key part of the Soviet push westward, blasting through enemy armor and fortifications alike.
If you like my post on this subject, stay tuned because there will many more of these coming! Also, leave a comment and let me know what else you would like to see in future posts. Thanks for reading!
The Imperial Japanese Army entered WWII with a mix of light tanks, medium tanks, and support vehicles designed primarily for infantry support and colonial campaigns in Asia. While they often struggled against heavier Allied armor, these vehicles played a vital role in Japan’s early successes and later desperate defenses.
Type 95 Ha-Go – The Light Spearhead
Type 94 Te-Ke and Type 95 Ha-Go
The Type 95 Ha-Go was Japan’s most common light tank of the war. Lightly armored but mobile, it was effective against infantry and lightly defended positions, especially in China and early Pacific campaigns. However, by mid-war, it was badly outclassed by Allied tanks.
Type 94 Te-Ke – The Scout Tankette
The Type 94 Te-Ke was a small tankette used primarily for reconnaissance and infantry support. Fast and maneuverable, it could cross rough terrain but was very lightly armed and armored. It often served as a supply hauler or escort vehicle in addition to its combat role.
Type 97 Chi-Ha – Japan’s Workhorse Medium Tank
Type 4 Ho-Ro and Type 97 Chi-Ha
The Type 97 Chi-Ha was the most produced Japanese medium tank of WWII. Armed with a 57mm gun (later upgraded to a 47mm high-velocity gun in the “Shinhoto” version), it formed the backbone of Japanese armored forces. Though effective early on, it struggled against the Sherman and T-34.
Type 4 Ho-Ro – The Self-Propelled Howitzer
The Type 4 Ho-Ro mounted a 150mm howitzer on the chassis of the Type 97 Chi-Ha. Used as a mobile artillery piece, it provided heavy fire support for infantry. Limited in number, it was mainly deployed in defensive roles in the Philippines and Okinawa.
Type 3 Chi-Nu – The Late War Medium Tank
The Type 3 Chi-Nu was developed to counter American Shermans, armed with a 75mm gun based on Japanese anti-aircraft designs. However, due to production shortages, it was built in small numbers and largely kept in Japan for homeland defense.
Type 3 Ka-Chi – The Amphibious Tank
The Type 3 Ka-Chi was a rare amphibious tank based on the Chi-Ha chassis. Designed for island invasions, it could move both on land and water thanks to its large pontoons and propellers. Only a handful were built, as Japan shifted to defensive warfare by the time it was introduced. This model is also my favourite of the lot, because of it’s unique look.
Type 1 Ho-Ha – The Half-Track Transport
The Type 1 Ho-Ha was Japan’s answer to the German Sd.Kfz. 251, a half-track used to transport infantry safely under fire. With armor protection and machine gun mounts, it improved troop mobility but was built in limited numbers.
Type 92 Heavy Armored Car (Sumida M2593) – The Colonial Scout
The Type 92 (Sumida M2593) was an armored car mainly used in China and Manchuria. It could run on both tracks and wheels, making it versatile for patrol and security duties. While not designed for tank combat, it was effective in colonial policing roles.
Here’s the full tutorial on how to build these below:
When people think of the German Luftwaffe during WWII, they picture sleek fighters screaming across the skies and powerful bombers darkening the horizon. The Luftwaffe introduced some of the most advanced designs of the war, from dive bombers to the world’s first operational jet fighter.
And since I’ve already built these aircraft in micro-scale, it was time to give them a proper showcase! Below you’ll find some of the most famous German aircraft, complete with photos, fun facts, and tutorials so you can build them yourself.
Messerschmitt Bf 109 – The Backbone Fighter
The Bf 109 was the Luftwaffe’s workhorse fighter. Fast, agile, and deadly, it flew from the Spanish Civil War all the way to the end of WWII. It was Germany’s most produced fighter and racked up countless air victories.
Bf 109 E-3 variant
The Bf 109 comes in an array of colour schemes, but I think the best known one is the grey and yellow variant(Bf 109E-3), which I’ve made here.
I used SNOT building techniques to achieve this paint scheme, but you can also interchange the tiles and bricks to fit another scheme of your choosing.
The main body uses a modified brick with 5 studs(travis brick), a brick I use very often, because it allows for building on all sides. It also gives me a cavity to put a 1×3 bar inside, so I can have a rotating propeller.
I was also able to fit some guns on the underside of the wings as well as landing gear.
Having said that, the wings are only attached with one stud, which may seem a little flimsy, but the clutch power is enough to keep this thing soaring. Nothing beats the clutch power of Lego!
Bf 109 B-2 variant
Just to prove a point, I attempted to build the Bf 109 B-2 variant as well, which is no easy feat considering dark green parts are rarer, but I think it turned out nicely with some minor changes.
Here’s a tutorial for the Bf-109:
Focke-Wulf Fw 190 – The “Butcher Bird”
Nicknamed the “Butcher Bird,” the Fw 190 gave Allied pilots nightmares. With its powerful engine, heavy armament, and excellent handling, it was considered one of the best fighters of the war.
I never got around to making a tutorial for this aircraft, but the basic frame is the same as the Bf-109.
Junkers Ju 87 Stuka – The Fearsome Dive Bomber
The Ju 87 Stuka dive bomber is infamous for its screaming sirens (the “Jericho Trumpets”) that terrified soldiers on the ground. While effective in early Blitzkrieg campaigns, it became vulnerable against stronger air defenses later in the war.
Messerschmitt Me 262 – The Jet Age Arrives
The Me 262 was the world’s first operational jet fighter. With speeds unmatched by Allied planes, it was far ahead of its time. However, it came too late in the war to change the outcome, but it inspired post-war jet designs worldwide.
Messerschmitt Bf 110 – The Heavy Fighter
The Bf 110 was a twin-engine heavy fighter designed for long range and heavy firepower. It struggled against nimble single-seat fighters, but later proved effective as a night fighter.
This ended up being my favourite build of the all the Luftwaffe, because it’s unique with it’s twin propellors and top MG turret.
Horten Ho 229 – The Flying Wing
The Horten Ho 229 was one of the most futuristic designs of WWII. Developed by the Horten brothers, it was the world’s first jet-powered flying wing. With its sleek, almost alien shape, it promised high speed, long range, and a reduced radar signature — earning it the nickname “the first stealth aircraft.”
The Ho 229 was intended to combine the speed of jet propulsion with the efficiency of a flying wing design, making it a potential game-changer. However, only a few prototypes were built before the war ended, and it never saw combat. Today, the only surviving Ho 229 is preserved at the Smithsonian National Air and Space Museum in the United States.
If you like my post on this subject, stay tuned because there will many more of these coming! Also, leave a comment and let me know what else you would like to see in future posts. Thanks for reading!
Tip: It’s all about trial and error. If you ask two people to build the same model in a certain scale, it will more or less look the same, but if you are experienced enough, you will know what the slight differences in technique and style are. Experiment for yourself!
When it came to naval power in World War II, no force projected strength across the oceans quite like the U.S. Navy. From the island-hopping campaigns in the Pacific to the D-Day landings in Europe, American innovation in aircraft and landing craft proved decisive.
I’ve recreated some of the most iconic U.S. Navy machines — the landing craft that carried men to the beaches and the aircraft that aided the marines to victory.
LCVP – The Higgins Boat
Known as the “Higgins boat,” the Landing Craft, Vehicle, Personnel (LCVP) was essential for amphibious invasions. With its front ramp, it could unload troops and jeeps directly onto the beach. From D-Day in Normandy to the Pacific islands, the LCVP became a symbol of Allied landings.
And that’s exactly what the Lego version can do too, it’s ramp can lower to release the Brickmini troops onto the beach, where you can recreate your own D-Day diorama.
LCM – Landing Craft, Mechanized
The LCM was larger than the LCVP and designed to carry tanks, vehicles, and heavy equipment ashore. It allowed the U.S. Navy to land armor directly onto contested beaches, supporting infantry with much-needed firepower. In the picture above, our LCM can fit one tank with a 1×3 stud width, or two Willys jeeps. Tutorial below:
Vought F4U Corsair – The “Whistling Death”
The Corsair was one of the most iconic carrier-based fighters of WWII. With its distinctive gull wings and powerful engine, it dominated the skies over the Pacific. Japanese pilots nicknamed it “Whistling Death” for the terrifying sound it made in dives. I was quite proud to recreate the canted wing effect in such a small scale, which was a defining feature of this aircraft. Another cool thing is the spinning propellers, which all of the aircraft feature.
Douglas SBD Dauntless – The Dive Bomber That Turned the Tide
The SBD Dauntless was the Navy’s main dive bomber and proved decisive in the Battle of Midway, where its pilots sank four Japanese carriers. Slow but rugged, the Dauntless earned its place in history as the plane that changed the course of the Pacific War.
Grumman F6F Hellcat – The Carrier Workhorse
The Hellcat was the backbone of the U.S. Navy’s fighter force. Built to be tough and reliable, it racked up more aerial victories than any other U.S. naval aircraft — over 5,000 enemy planes shot down. Designed to dominate Japanese Zeroes, it quickly became the Navy’s most successful fighter.
TBF Avenger – Torpedo Bomber Power
The Grumman TBF Avenger was a heavy torpedo bomber that gave the U.S. Navy the punch it needed against Japanese ships and carriers. With a crew of three, folding wings, and a bomb bay that could carry a torpedo or bombs, the Avenger combined toughness with versatility. It made its combat debut at the Battle of Midway and went on to become one of the most produced naval aircraft of the war.
This is also the largest of the naval fighters/bombers as you can see and has two machine gun turrets, top and bottom, which I use minifig hands to replicate.
DUKW – The Amphibious Truck
Nicknamed the “Duck,” the DUKW was a 6-wheel drive amphibious truck used by the U.S. military to ferry cargo, troops, and supplies from ship to shore. Unlike landing craft, the DUKW could drive directly off the beach and continue inland, making it invaluable for logistics during invasions. Over 20,000 were built, and their versatility made them a workhorse in both the European and Pacific theaters.
PT Boat – The Fast Attack Craft
Small, fast, and armed with torpedoes, Patrol Torpedo (PT) boats became famous for daring hit-and-run tactics against larger enemy ships. Crewed by just over a dozen men, these wooden boats relied on speed and surprise rather than armor. One of the most famous, PT-109, was commanded by future U.S. President John F. Kennedy.
Here’s a tutorial on how to build your own!
If you like my post on this subject, stay tuned because there will many more of these coming! Also, leave a comment and let me know what else you would like to see in future posts. Thanks for reading!
Tip: Bars and clips can be used in many ways, and can even help you build upside down.
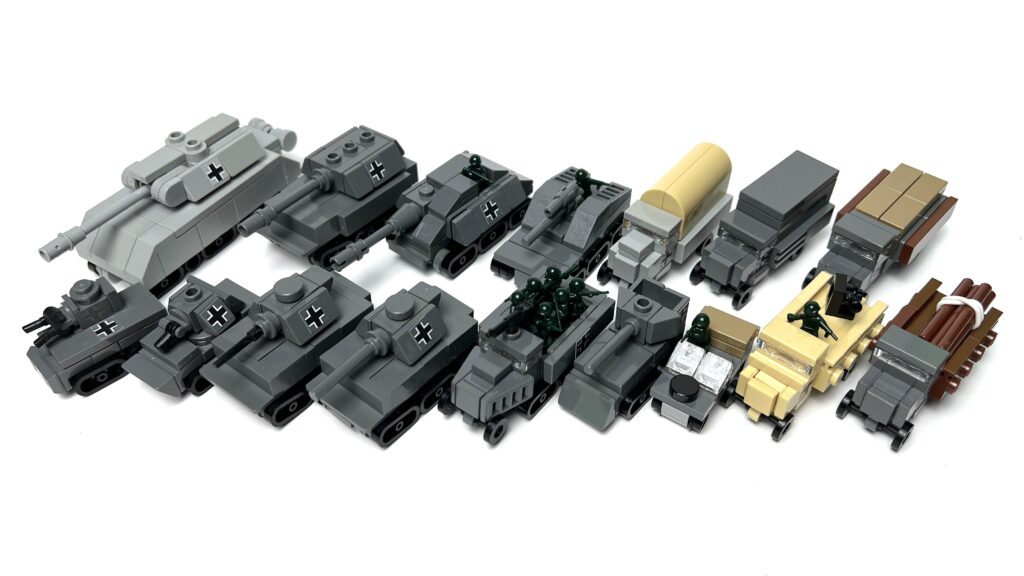
When you think about German WWII vehicles, most people immediately recall the iconic Tiger. But beyond the Tiger, the German army fielded a wide variety of vehicles—each with its own role on the battlefield. From nimble early-war tanks to heavy tank destroyers and even supply trucks, these machines defined the way Germany fought during the war.
Naturally, I had to bring these legends to life in micro-scale! Below you’ll find my custom builds of some of the most famous German vehicles—each with photos, videos, and tutorials so you can build them yourself.
Panzer I – The Beginning
The Panzer I may have been lightly armed with just machine guns, but it marked the start of Germany’s armoured force. Small, fast, and easy to produce, it trained the crews who would later fight in more advanced tanks.
This small vehicle could only hold a crew of two and first saw combat in the Spanish Civil War from 1936-1939.
I tried my best to recreate this in 1:120 scale which proved to be very difficult because of how small the tank is in real life. In fact, in the Micro Brick Battle rulebook, it’s not even listed there, so if you want to use this in the game, you’d have to assign your own attack and defend values.
At only 4 studs in length, I think this might be the smallest tank I’ve made thus far. I was thinking how best to represent the model and since the most prominent part was the turret, I tried to make that stand out. I used minifigure hands to represent the dual machine guns, the only appropriate piece I could find that worked.
Panzer II – A Step Up
The Panzer II improved on its predecessor by adding a 20mm autocannon, giving it a bit more punch. While still underpowered against heavier Allied armor, it played a vital role in the Blitzkrieg campaigns.
The Panzer II was meant as a interim replacement to its predecessor, until more advanced and bigger tanks were developed. It saw improvements to its amour and weapon, which now sported a single 20mm KwK 30 L/55 auto-cannon. This tank played an important role during the Polish and French campaigns of the war.
The design for this tank was just a slight modification of the Panzer I and change to the turret design, and I found that the short bar with clip(from Brickarms) could imitate the look of an auto-cannon.
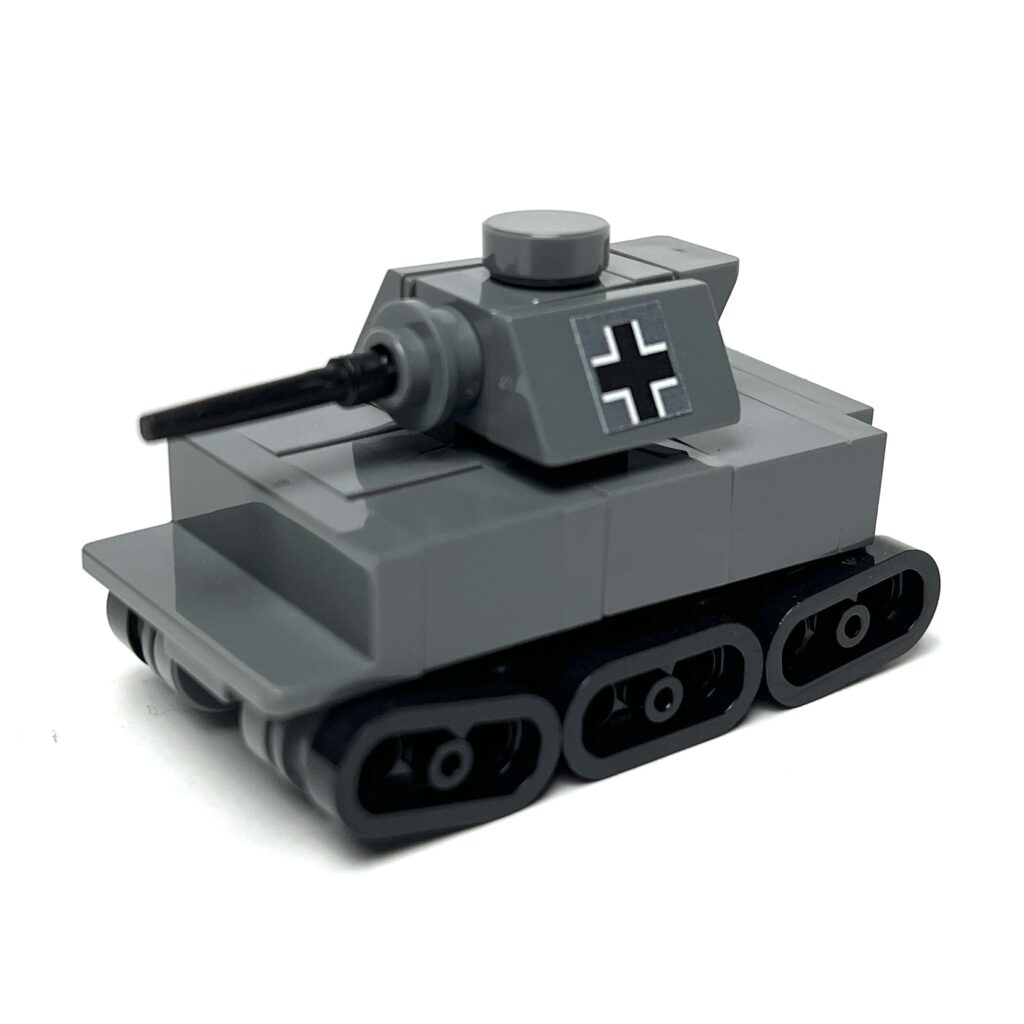
Panzer III – The Workhorse
The Panzer III was Germany’s main battle tank in the early years of the war. It came equipped with a 37mm and later 50mm gun, and it served in huge numbers across Europe and North Africa.
The Panzer III was the first medium tank of the series and was used extensively in WWII as an infantry support type of tank.
Its main gun was a 37mm cannon(Ausf. A-G) and many variants of this was produced with different calibers.
Here you can see the size difference with the light and medium Panzers, and I once again used the Harry Potter wand for the barrel.
Panzer IV – The Backbone of the Wehrmacht
If there was one tank that saw the entire war from start to finish, it was the Panzer IV. Constantly upgraded with thicker armor and more powerful guns, it remained Germany’s most reliable and widely used tank.
Similar to the III, with an upgrade in firepower. The Panzer IV was manufactured in response to the formidable Russian T-34’s. It was the second most produced German tank in the Second World War with a total of 8,553.
Back to the build, the body for the IV is the same as the III, with only a slight modification on the turret. Swapped out that 37mm for a 75mm, and you can see a 1×3 bar in dark bluish grey does the job.
Now you are ready to have your first game of Micro Brick Battle, you can choose to pit the Shermans(see my other post) against the Panzers!
Elefant – The Beastly Tank Destroyer
The Maus and Elefant
Built on the failed Porsche Tiger chassis, the Elefant was a massive tank destroyer carrying the powerful 88mm Pak 43 gun. While heavily armored, it struggled with mechanical issues and lack of mobility.
Maus – The Super-Heavy Tank
The Maus was the heaviest tank ever built, weighing a staggering 188 tons. Armed with a massive 128mm gun and thick armor that no Allied weapon could reliably penetrate, it was designed to be nearly unstoppable. In reality, only two prototypes were completed, and its size made it impractical for warfare. Still, the Maus has become legendary among tank enthusiasts for its sheer scale and ambition.
Hummel – The Mobile Howitzer
Jagdpanther and Hummel
The Hummel (“Bumblebee”) carried a 150mm howitzer, providing crucial artillery support for German divisions. It combined firepower with mobility, making it a dangerous battlefield presence.
Jagdpanther – The Deadly Predator
One of the most feared tank destroyers of the war, the Jagdpanther combined Panther tank armor with the long 88mm gun. It was powerful, well-armored, and deadly effective against Allied tanks.
Opel Blitz – The Workhorse Truck
No army runs on tanks alone—the Opel Blitz was Germany’s most common military truck. It transported supplies, troops, and even served as a platform for anti-aircraft guns. Without it, the German war machine would have stalled.
Marder III – Stopgap Tank Destroyer
The Marder III was built by mounting captured Soviet or German guns on obsolete tank chassis. While vulnerable due to its thin armor, it gave German forces much-needed firepower against Soviet armor in the mid-war years. In the video below, I show you how to build the Marder III along with a Kubelwagen and Sd.Kfz.251 as a bonus!
If you like my post on this subject, stay tuned and subscribe to my mailing list because there will many more of these coming! Also, leave a comment and let me know what else you would like to see in future posts. Thanks for reading!
Tip: Sort your Lego pieces, it will help you understand the different types and colours available to use in your creations. I personally sort by type and then colour, and after years of doing this I have found that it is the most efficient way for me to find things.
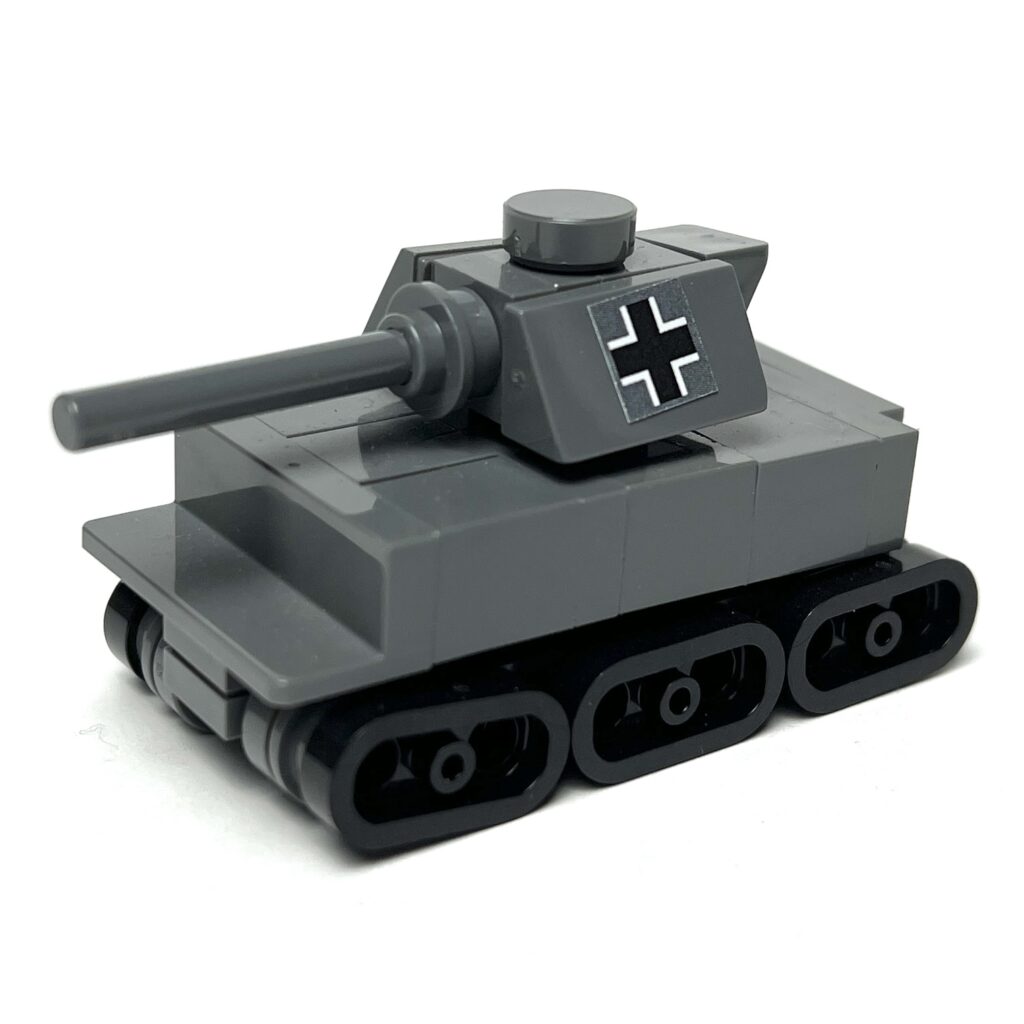
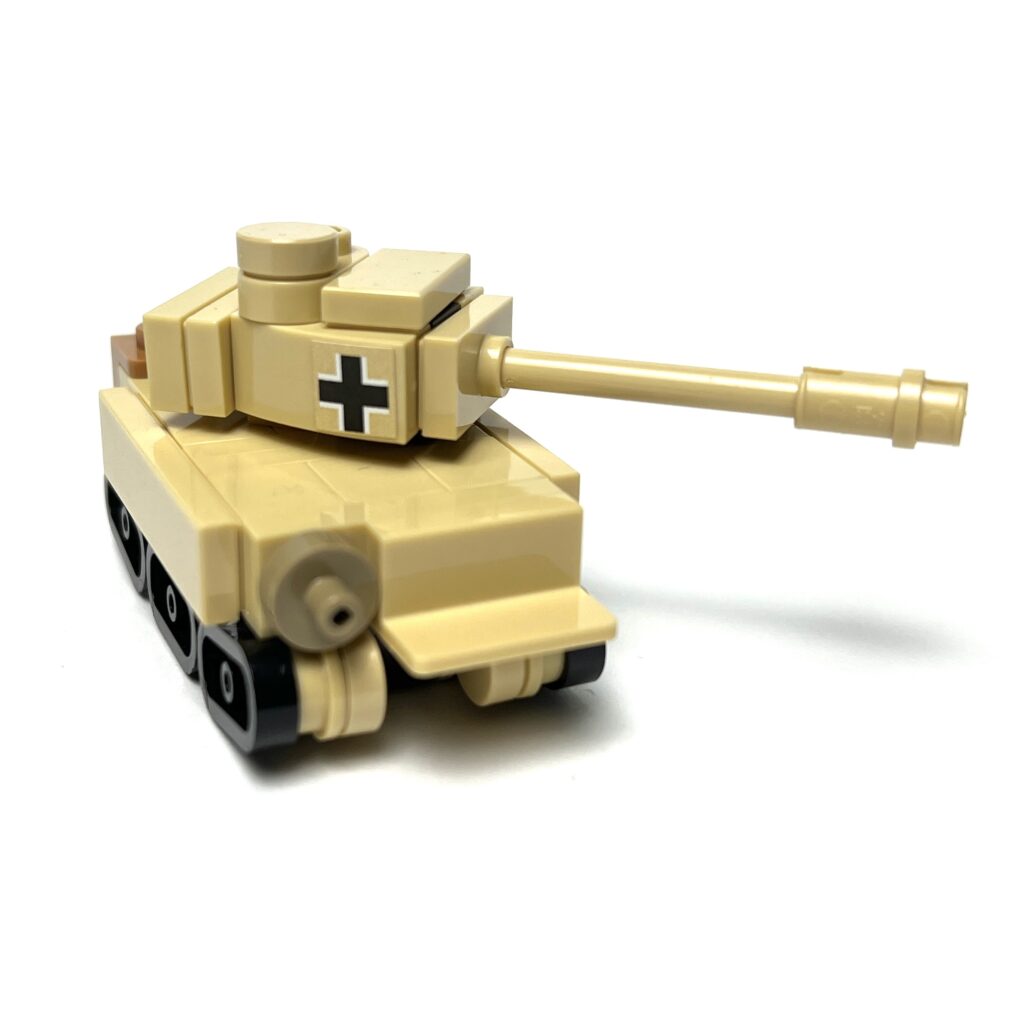
I think about a top-of-the-food chain predator, dangerous, strong and lethal. That’s why the name is very befitting of the German heavy tank known as the Panzerkampfwagen VI or simply Tiger I. There is also a Tiger II, also called a King Tiger, but that would be for another post.
Possibly one of the most well known tanks among enthusiasts and modellers, it seems everyone has done some version of this revered vehicle before, whether using building bricks or with custom painted plastic model kits.
So what makes the Tiger a formidable foe? That would have to be its 88mm KwK 36 gun and thick armour plating with the frontal hull armour of 100mm and 60mm to the sides.
Of course, we had to make this tank in micro-scale, I mean how can you have a tank battle without the Tiger I?
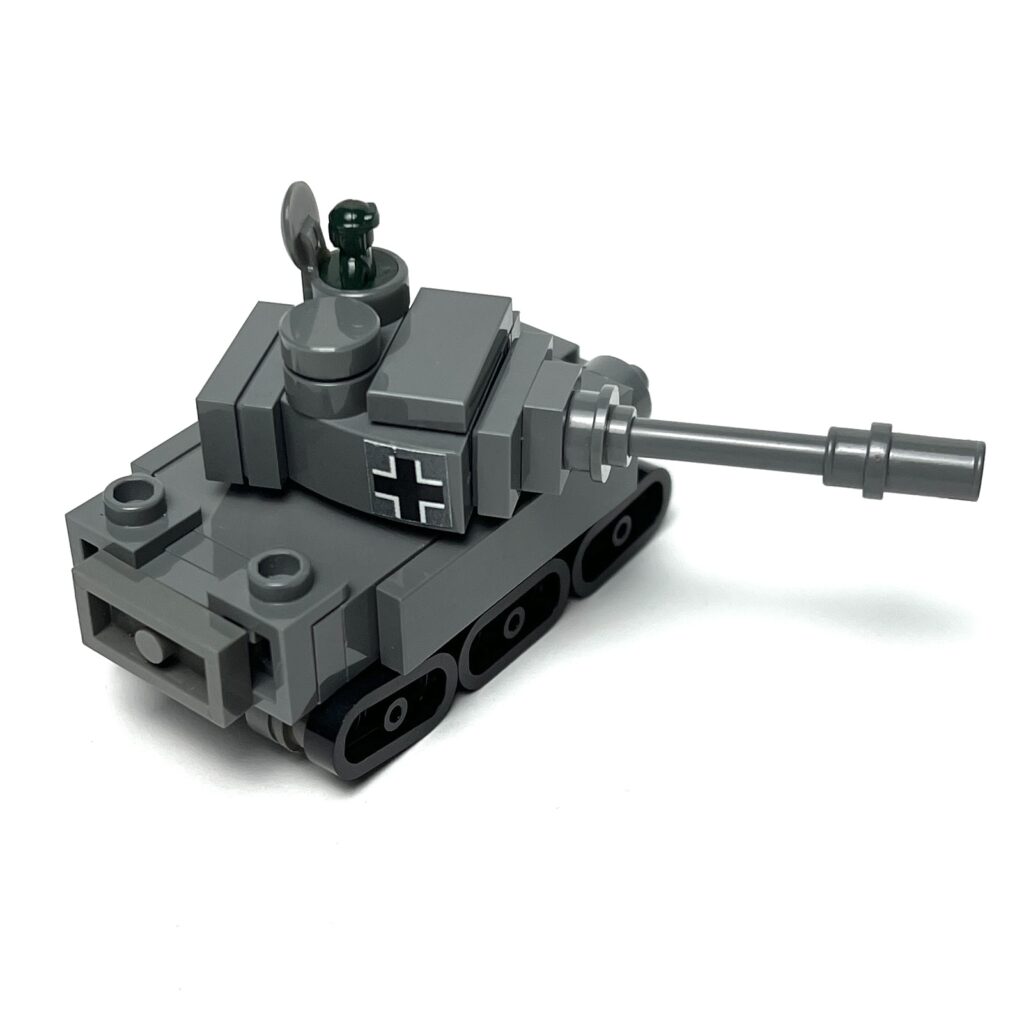
I created the first version in dark bluish grey, because it seemed to be the most common colour scheme. After some measurements(using sariel’s unit converter), I started with the turret first and made sure to have the two opening hatches, which could fit one commander up top as you can see here. I choose dark green for the German army soldiers because the Allies are in olive drab.
Underbelly of the beast
Then i worked on the main body which had to look a bit chunky, hence the addition of 1×4 tiles on the side.
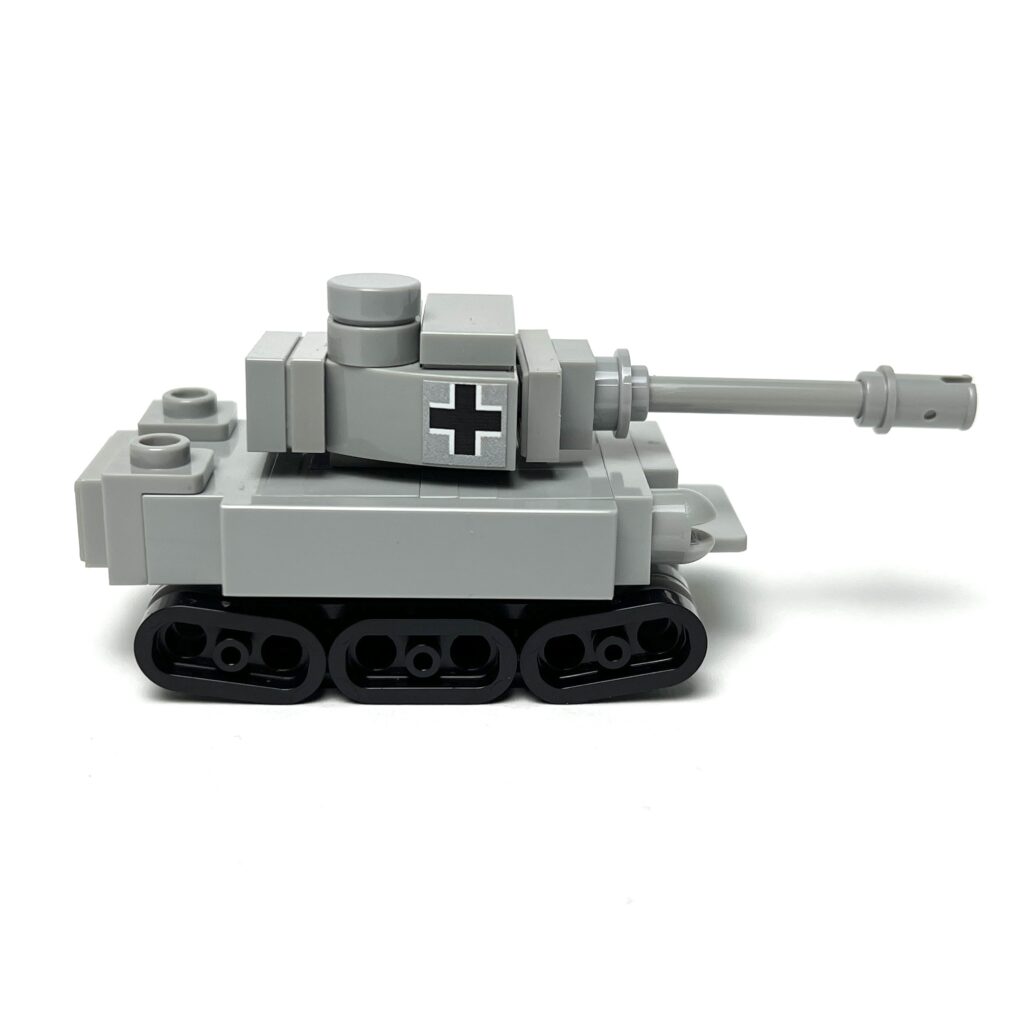
Once I was happy with my design, i just modelled another one in light bluish grey just to see if I had all the parts. I didn’t have one particular piece(1×3 panel), so I modified it to have the MG gunner slit on the left.
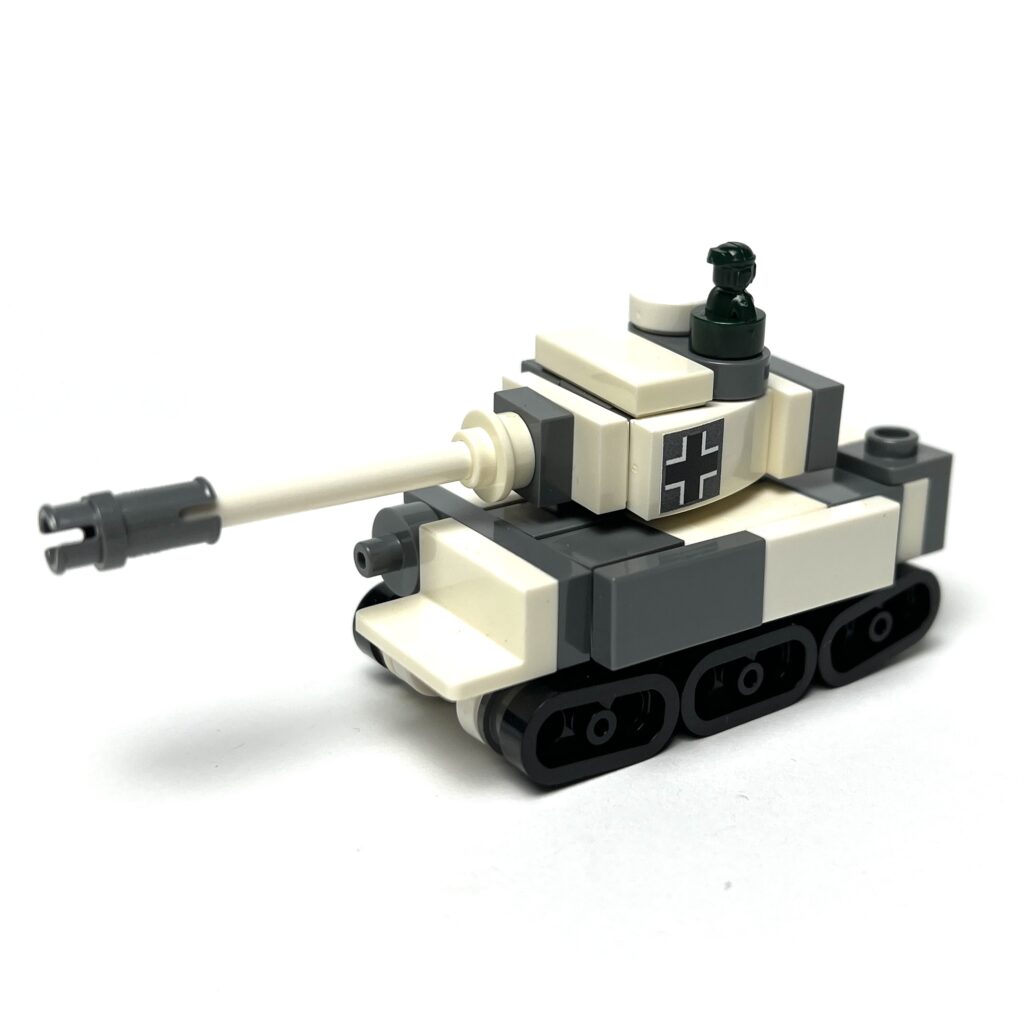
Then I also remembered seeing a winter camouflage version before, so I added that to the battalion.
The last one I made is a tan variant, used in the North Africa campaign, also the same one you see in the movie Fury.
The actual Tiger 131 used in the film Fury
Fun fact: Did you know, the Tiger I featured in Fury, is an actual working version and it was a Tiger 131 captured by the British in Tunisia during World War II. It is the only operating Tiger tank in the world. It was also the first time a real Tiger appeared in a feature film since Theirs Is The Glory in 1946. It is now preserved at The Tank Museum in Bovington, England.
Below you will find a tutorial on how to build all four versions:
If you like my post on this subject, stay tuned because there will many more of these coming! Also, leave a comment and let me know what else you would like to see in future posts. Thanks for reading!
Tip: I use tiles a lot, to give the model a certain look, whether to feel more minimalistic or clean, or to mimic the look of armour plating, tiles are a stable part of micro-scale building. There are so many different kind of tiles, round, angled, grill etc, so play around with these. And if you want to remove a tile from a plate, remember to use a Lego Brick Separator to save your fingernails!
I always wondered why they named the North American Aviation P-51 “Mustang”. Horses can’t fly right?
I digress, the P-51 was a long-range, single-seat fighter/fighter-bomber used in WWII and the Korean War. It used an engine called the Packard V-1650 Merlin and was armed with six M2 Browning machine guns, damn, that’s a lot of fire power for an airplane of that era.
The Mustang was very good in a dog fight and would escort bombers during raids over Germany. It saw battle during the North Africa, Mediterranean, Italian and Pacific theatres too and apparently destroyed 4,950 enemy aircraft by the war’s end.
P-51’s save the day in Saving Private Ryan
The first time I saw it was in Saving Private Ryan, when Tom Hanks was on the brink of death facing a Tiger 1 and a P-51 swooped in to destroy it.
Christian Bale’s character with a P-51 behind him
Or who can forget the scene in Empire of the Sun when Christian Bale shouts “P-51 Mustang, Cadillac of the sky!” as a squadron flies in to liberate the POW camp?
I had built a P-51 before in a slightly larger scale(1:90) so it wasn’t too difficult to miniaturise it further. Some details are very hard to include when working in a small scale but I managed to fit wheels and guns into this MOC, both done using a 1×1 round plate with bar, a very versatile piece.
This aircraft comes in many paint schemes and the first one I made is what I believe to be from the 375th Squadron, but you could easily change out a few pieces to get the squadron colours you like.
For example, the second one with the blue nose is from the 487th Fighter Squadron, and I added in some stickers which I printed out on label paper and cut out. It’s a painstaking process but I did it just to add that little extra detail, although a printed tile would be much better on the eyes.
I also used black and white tiles as the “invasion stripes”, which the allies used to differentiate between friend or foe.
The last one is from the P-51 Tuskegee Airmen Red Tail Squadron, and was featured in the movie Red Tails. It was only after watching that film that I learnt about the brave African-American pilots who risked their lives during WWII, a period where segregation was still predominant. It’s an inspiring drama that is worth a watch.
Red Tails escorting bomber aircraft
Here’s how to build my version of the P-51 Mustang:
If you like my post on this subject, stay tuned and subscribe to my mailing list because there will many more of these coming! Also, leave a comment and let me know what else you would like to see in future posts. Thanks for reading!
Tip: Using 1×1 modified bricks with studs gives you choices when building sideways so play around with these useful pieces, especially headlight bricks!
Today I want to talk about probably the most popular tank of World War II, the M4 Sherman.
The M4 Sherman was the most widely used medium tank harnessed by the Allies during that period. It was named after General William Tecumseh Sherman who served during the American Civil War in 1861.
This tank was mass produced by the United States and was an important piece of machinery, not because it was better on the battlefield but because the Allies could manufacture these at a faster pace and was able to repair and replace parts with greater efficiency. This advantage was a turning point for the Allies during the war.
Here I’ve made the most basic version, and while I didn’t plan on copying anyone, similarities in this scale(1:120) are unavoidable. That said, I used a different technique to create the tracks(which is a bit of an overkill), by using 1×2 round plates and I found that it is more modular than the technic beam piece normally employed. I can go from 5, to 6 or 7 studs with ease. It’s looks more detailed even on the underbelly, which I also tried to make convincing in this scale. I actually used curves and plates in my initial design for the tracks but scrapped it after developing this technique instead. I think it’s just more visually appealing because you can have a very slight bend on the “tracks” and with the holes, it kind of looks like wheels.
I also remember seeing in one of Brick Mini’s photos of how a Harry Potter wand would be useful as a barrel and that element was perfect for this scale. The stickers and nano figure elements of course can be found at Brickmania and Brick Mini.
Another feature of the Sherman was how adaptable it became, which saw many forms during its service. There are too many to name here, but one of my favourites include the M4A3E8(Easy Eight).
If you’ve watched the movie Fury, you would have seen this bad boy in action against the fearsome Tiger 1. (Note to self, I have to make a diorama of that at some point!)
I then made some modifications on the original build and upgraded the gun, (the most prominent change) and also added in that M2 Browning to complete the look.
There is also the Sherman DD(duplex drive), which is an amphibious version used during the Normandy landings. You’ll recognise it because of the protruding snorkels(which was very difficult to add to the small body). Finally I squared it off with the some tan tiles, held together by 1×1 brackets.
I researched a little bit more and saw they had a minesweeper variant as well! This one was a little easier to make as it was just an attachment consisting of 4 pieces.
That short chain piece really came in handy, but you could also use other things like minifigure hands or even a technic pin in dark bluish grey that could do the job.
The last variant I wanted to build was the Rocket Launcher T34, and the rocket attachment was a quick assembly using claw pieces clipped onto a 1×3 bar. I modified the turret by adding brackets which would hold the thing in place. I used the shorter clips from Brickmania because it looked nicer, but if you don’t have those you could just stick to the claw piece(48729b).
All these models could be used in the Micro Brick Battle game and here’s a tutorial if you want to build one:
There is already an extensive archive of models they have created before, but I’m just adding on to that world piece by piece.
If you like my post on this subject, stay tuned and subscribe to my mailing list because there will many more of these coming! Also, leave a comment and let me know what else you would like to see in future posts. Thanks for reading!
Tip: Every plate matters when building in micro-scale. 1 brick = 3 plates height and 2.5 plates width.